The Quest
During the Insomni’hack 2024 CTF, A colleague and I did this challenge, we decided to make a writeup for it because the methods used to solve this challenge were really interesting to explain. The goal of this challenge is to open every part of the wooden box next to admin tables.
Initial Step : Read the introduction
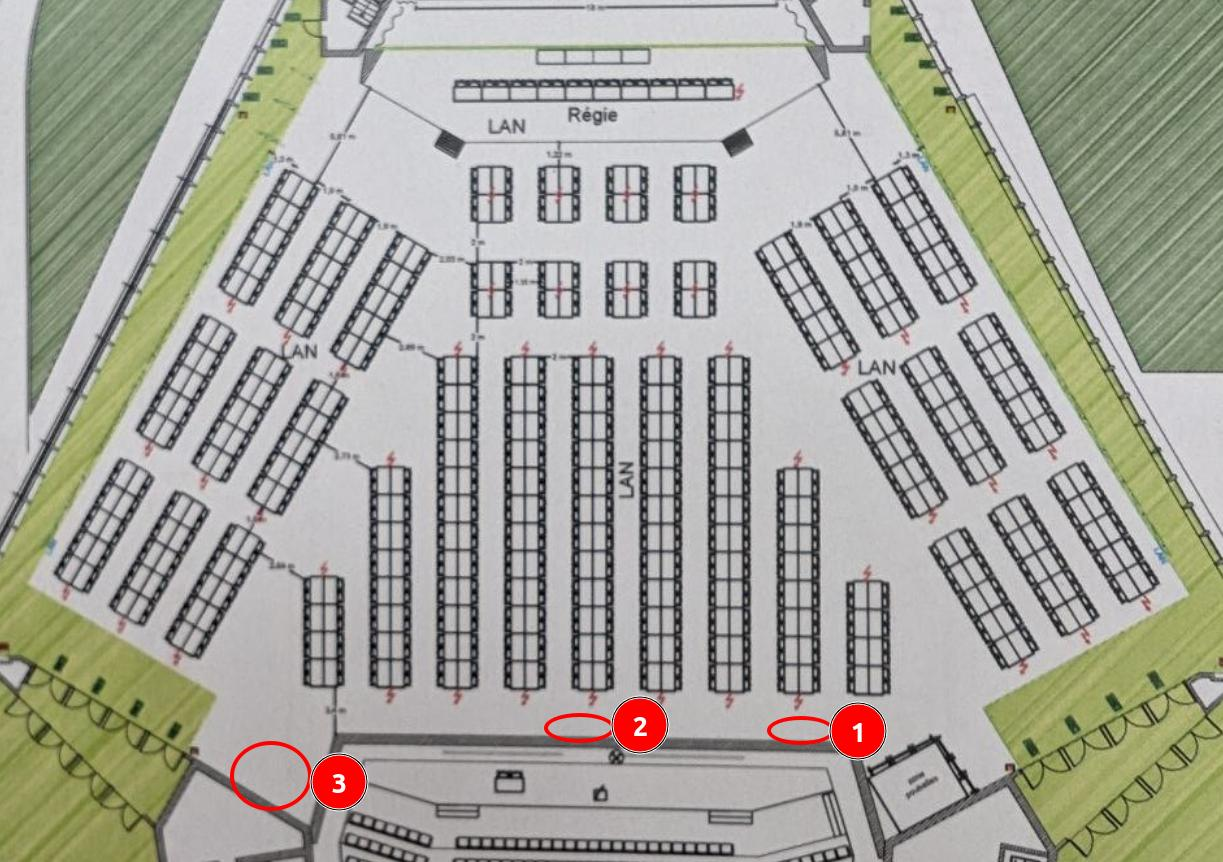
Here’s the map provided in the challenge statement. It represents the room where the CTF takes place. You can see three red circles, each representing the starting point of the three parts necessary to solve the box. Each part can be solved independently of the others.
First Step : Painful Bruteforce
When you arrived at location number 1, you find a table. On it, there’s a bowl containing convention badges and 2 books. After flipping through the books, you’ll find a USB key containing an interesting file firmware_keypad.bin. We decided to reverse the code with BinaryNinja and we find a function called validate_code.
In the first part of the wooden box, we could see a keypad and a closed wooden trapdoor.
1
2
3
4
5
6
7
8
9
10
11
12
13
14
15
16
17
18
19
20
21
22
23
24
25
26
27
28
29
30
31
uint64_t validate_code()

      int64_t var_38
      __builtin_strcpy(dest: &var_38, src: ":1N50QU357")
      int64_t var_8 = 0x19
      void var_140
      void* var_10 = &var_140
      strcpy(var_10, &code, 0x33555130354e313a)
      strcat(var_10, &var_38)
      size_t var_18 = 0x10
      int64_t var_20 = 0xf
      md5String(var_10, &var_140 - 0x10)
      int128_t var_a0
      __builtin_strncpy(dest: &var_a0, src: "33c12ea236cc81d7deb97e432aedc9d4", n: 0x21)
      void* x0_6
      int64_t x1_2
      x0_6, x1_2 = hexstr_to_char(&var_a0)
      void var_78
      fastpbkdf2_hmac_sha512(&var_140 - 0x10, var_18, x0_6, x1_2, 0x64, &var_78, 0x40)
      void* x0_9
      int64_t x1_5
      x0_9, x1_5 = hexstr_to_char("6d47dd806bdf0677abfdca674206650a…")
      if (x1_5 == 0x40)
          int32_t x0_12 = memcmp(&var_78, x0_9, 0x40)
          free(x0_9)
          int64_t var_c0_1 = 0
          free(x0_6)
          int64_t var_b0_1 = 0
          return zx.q(x0_12)
      __assert_fail(assertion: "expected.length == PKBDF2_OUT_SI…", file: "firmware.c", line: 0x8d, function: "validate_code")
      noreturn
This code describes the authentication mechanism used by the keypad to verify the user input and compare it to the expected result: 6d47dd806bdf0677abfdca674206650aaa58fcb3669e76d1b60fb1fb91d50a54f4483f6a721cc3e8acc87f536f9419d782dcc8e7b443574530
The objective here is to create a Python script that follows the same user input treatment in order to try to generate this character string through bruteforce, to obtain the code of the keypad.
So, in the code, we identify the different steps used to generate the string:
- Concatenation of the code entered on the keypad with the string
:1N50QU357. - Hashing of the newly created string using MD5.
- Utilization of the pbkdf2_hmac algorithm with the following parameters found in the call of the function :
- Length:
64 - Salt:
0x33c12ea236cc81d7deb97e432aedc9d4 - Iterations:
100 - Algorithm:
SHA-512
- Length:
We learned from the challenge admin that the code was at least ten characters long. In the code, the variable code used to contain the user input has a buffer of 20 characters. On the keypad, there are 14 possible characters, making brute-forcing a password impossible within the competition time frame. This leads us to believe that we are missing an element to reduce the number of possibilities.
Let’s recall that on table number 1, in addition to the USB key, there were badges. The idea here is to slide the badge in between the door and the frame to press the latch that is keeping the door closed, therefore opening it.
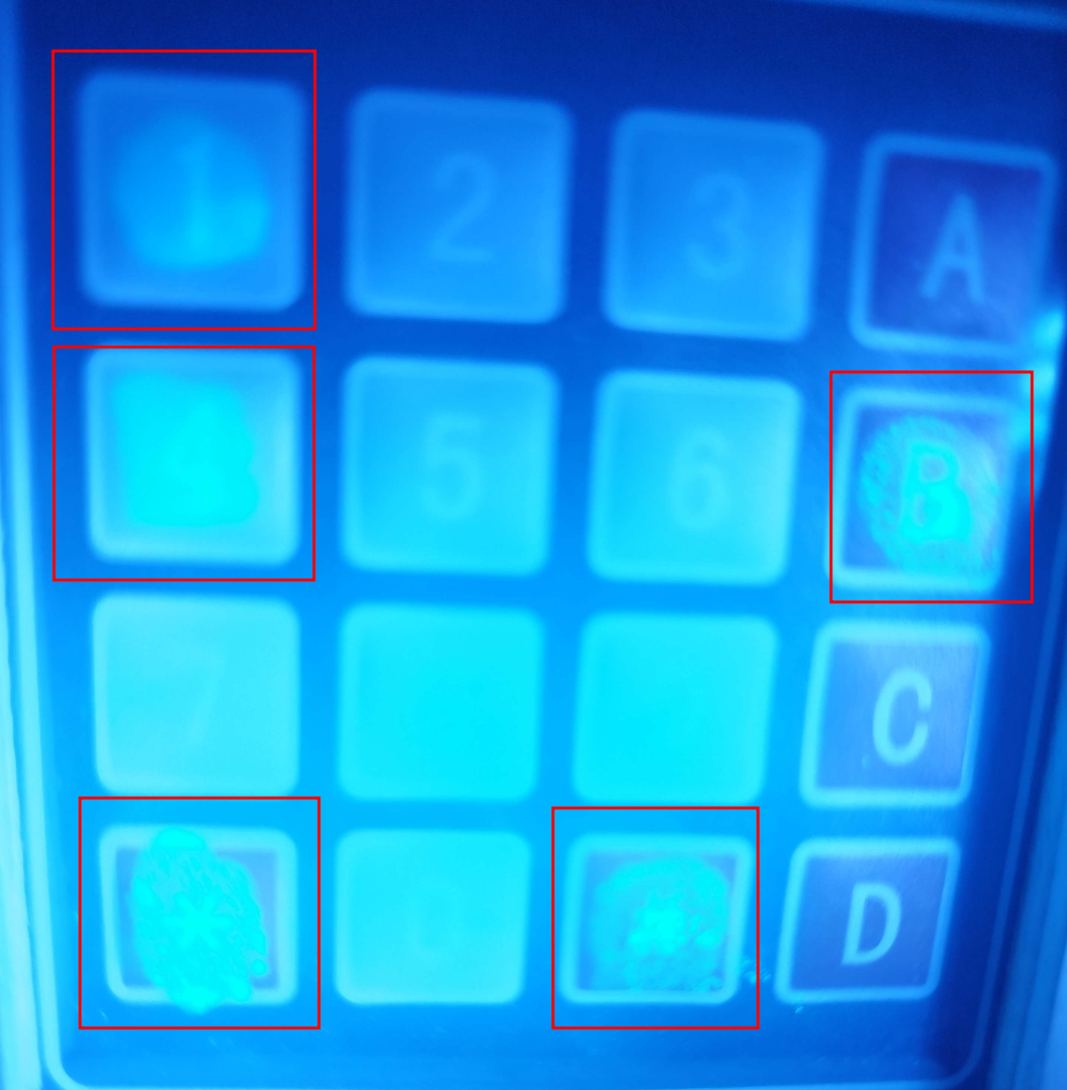
So, we see that the characters supposedly simulating sweat from an admin on the keypad, showing the used buttons (14B#). The character * was not counted as it was used to validate the code. Consequently, this greatly reduces the number of possibilities. Unfortunately, we do not know the exact length of the password, so all we can do is wait for our code to find the correct one.
1
2
3
4
5
6
7
8
9
10
11
12
13
14
15
16
17
18
19
20
21
22
23
24
25
26
27
28
29
30
31
32
33
34
35
36
37
38
39
40
41
42
43
44
45
46
47
48
49
50
51
52
53
54
55
56
57
58
import itertools
import binascii
import hashlib
from cryptography.hazmat.primitives import hashes
from cryptography.hazmat.primitives.kdf.pbkdf2 import PBKDF2HMAC
from cryptography.hazmat.backends import default_backend

def generate_hash(code):
    # Concatenate the special string
    full_code = code + ":1N50QU357"

    # Hash the complete code string using MD5
    md5_hasher = hashlib.md5()
    md5_hasher.update(full_code.encode())
    code_hash = md5_hasher.digest()

    # Fixed salt
    salt = binascii.unhexlify("33c12ea236cc81d7deb97e432aedc9d4")

    # Create a PBKDF2HMAC object
    kdf = PBKDF2HMAC(
        algorithm=hashes.SHA512(),
        length=64,  # The output size in bytes
        salt=salt,
        iterations=100,
        backend=default_backend()
    )

    # Generate and return the PBKDF2 hash
    return kdf.derive(code_hash)

# Expected hash prefix for comparison
expected_prefix = "6d47dd806bdf0677abfdca6"

# Initialize counter for controlling the printing frequency
print_counter = 0

# Bruteforce loop
for i in range(4, 19):  # Loop from length 4 to 18
    characters = '14B#'
    n = i  # Number of positions

    # Generating all possible combinations of length n
    for combination in itertools.product(characters, repeat=n):
        print_counter += 1
        trying = ''.join(combination)
        current_hash = generate_hash(trying)
        current_hex = binascii.hexlify(current_hash).decode()

        # Print only every 10,000 tests or if the correct hash is found
        if print_counter % 10000 == 0 or current_hex.startswith(expected_prefix):
            print(f"Testing {print_counter}: Trying: {trying}, Generated Hash: {current_hex}")

        if current_hex.startswith(expected_prefix):
            print("Found it! Matching prefix:", expected_prefix)
            break
    if current_hex.startswith(expected_prefix):
        break
We finally find it after 30 minutes … (plz next time give the exact lenght with the lamp)
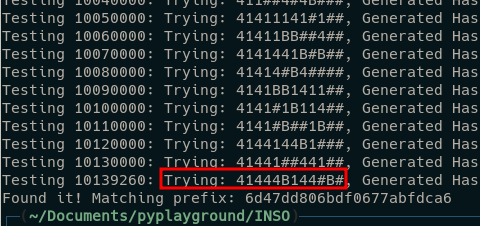
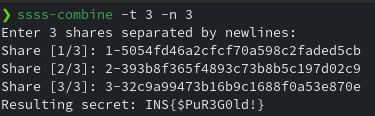
We enter the code and obtain the first part of the flag : 1-5054fd46a2cfcf70a598c2faded5cb
Second Part : Don’t use Popen
Just like in the first part, everything starts at table number 2. On it, there’s a QR code that we scan to retrieve an encrypted zip archive, three books, and Mifare 1K NFC tags.
The first reflex I had (thanks to the first step) was to look into the books, and indeed, we find a password: moonlight. This allows us to decrypt the archive.
In this archive were two files. Firstly, the code of the Python application used to authenticate the badge on the RFID reader present in the second part of the wooden box, and a personal note belonging to a fictional employee of the company, encouraging us to go to page 305 of one of the books on table number 2.
Once on the page, we realize that several pages are sticked together. With the flashlight on my phone (which I placed under the page to try to see through), I find an NFC tag that I copy with my Flipper Zero (it’s also possible to do this with your phone using the Mifare Classic Tools app).
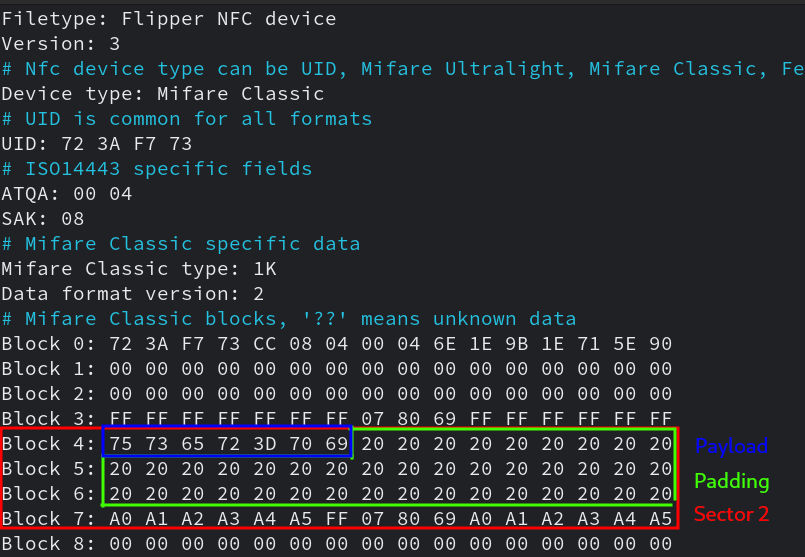
Once we badge this badge, it informs us that we are the user pi, but apparently we don’t have access to the box with this account. Let’s read the application code to find out more.
After a quick read, we observe that the “user” field is used in the function subprocess.Popen to check the user’s groups. However, this function executes a bash command directly on the machine without verifying user inputs.
1
2
3
4
...
output,retcode = subprocess.Popen("groups {}".format(user), shell=True, stdout=subprocess.PIPE).communicate()
groups=output.decode('utf-8')
...
We also learn that the display cannot show more than 15 characters at a time.
1
2
3
4
5
6
7
8
9
10
11
12
13
14
15
16
17
18
...
                # Check user privileges.
                if groups.count(ADMIN_GROUP) > 0:
                    print("[+] Success!")
                    disp_file('flag.txt')
                else:
                    print("[-] Error, user do not have the proper group ...")
                    disp("Wrong group...   ",groups[0:15],255,0,0)
                    time.sleep(5)
            else:
                print("[-] Error, no user entry !")
                disp("Error!          ","No user entry...",255,0,0)
                time.sleep(1)
        else:
            print("[-] Can't access sector", Sector, "!\n")
            disp("Error!          ","Sector access...",255,0,0)
            time.sleep(1)
...
Currently, the executed bash command looks like this: groups pi. By modifying the NFC tag, we can change user=pi to whatever we want with modify sector 2 on Mifare tag, for example: ;cat flag.txt to create bash command like groups;cat flag.txt, which would display the contents of flag.txt.
Unfortunately, the groups command’s output pollutes the display of the command’s result, which leads us to the following payload:
Intended Solve
1
user=>/dev/null;cat flag.txt
Indeed, we can redirect stdout to /dev/null to empty stdout and thus leave the first 15 characters of the display for our flag.
Unfortunately, the content of flag.txt is longer than 15 characters, so we modify our payload to display the flag in multiple parts using cut.
1
user=>/dev/null;cat flag.txt|cut -c 1-15
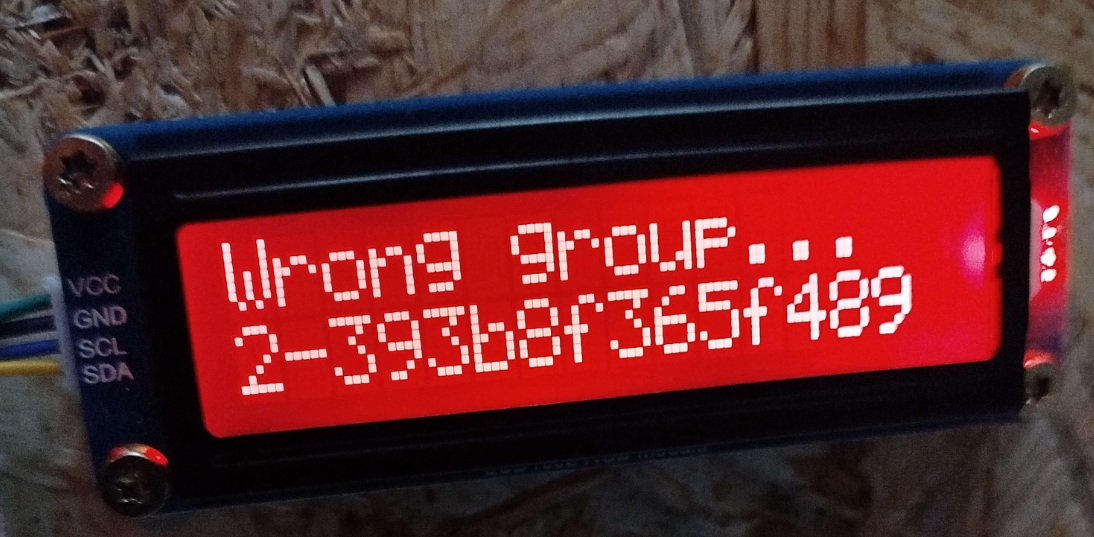
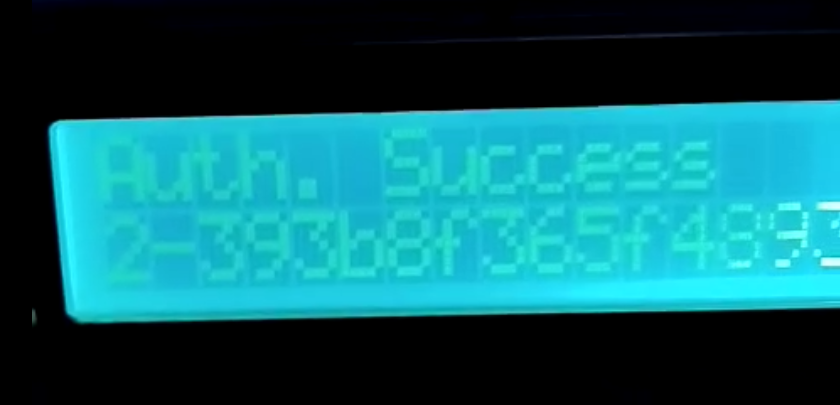
This was the first part of the flag with the same process we are able to extract the following flag : 2‑393b8f365f4893c73b8b5c197d02c9
Unintended Solve
Another solution for part two exists due to an oversight by the administrators of not clearing the .bash_history file. In fact, if the following payload was used, the authentication was considered valid:
1
user=>/dev/null;cat *
In reality, during the creation of the challenge, when the administrator group was created, the value remained in the .bash_history file. When the command’s output is stored in the groups variable, the use of the count() function checks for the presence of the ADMIN_GROUP string, which is unknown to us. Since this string is in the .bash_history file and therefore also in the groups variable, it validates the test and allows the authentication.
Third Part : Getting physical
Once we arrive at the third table, we can see a small wooden box with a padlock. Once picked, we open the box and can see this picture :
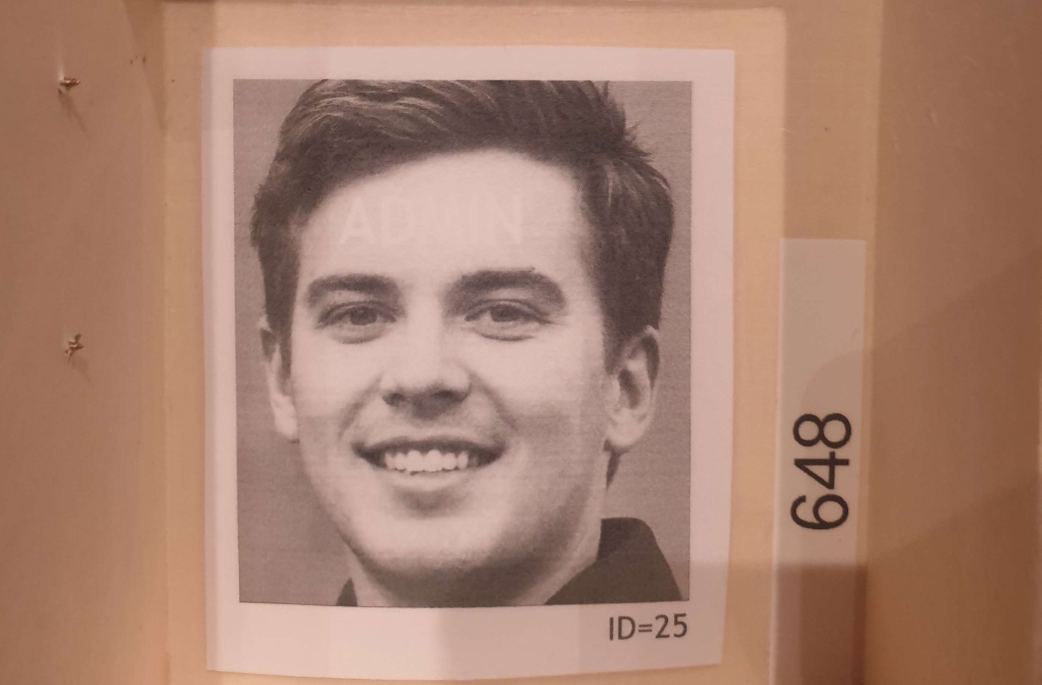
The third part of the box is protected by a 3-digits combination padlock, with the code being 648, as written on the picture.
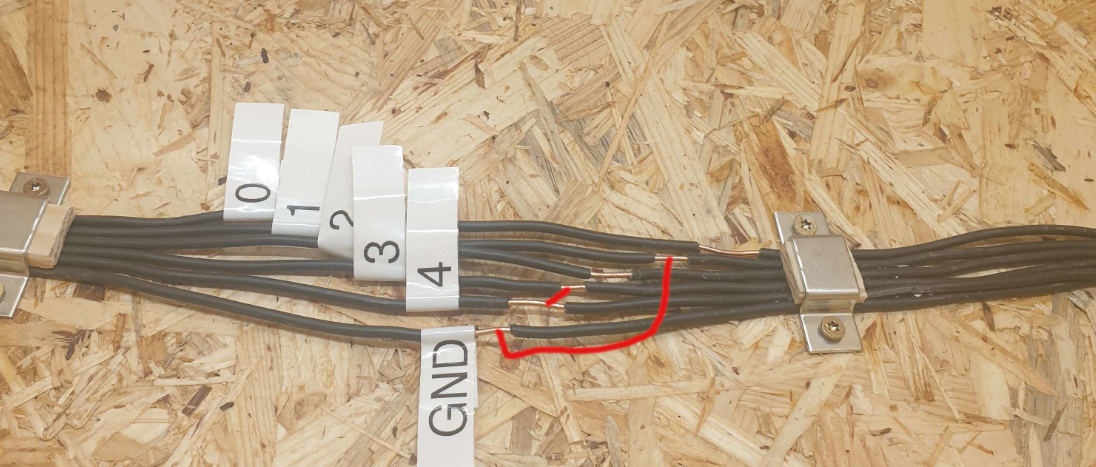
Once the third part of the wooden box is open, we can see two things: documentation explaining the operation of the facial recognition mechanism and the wires connecting the camera to the controller
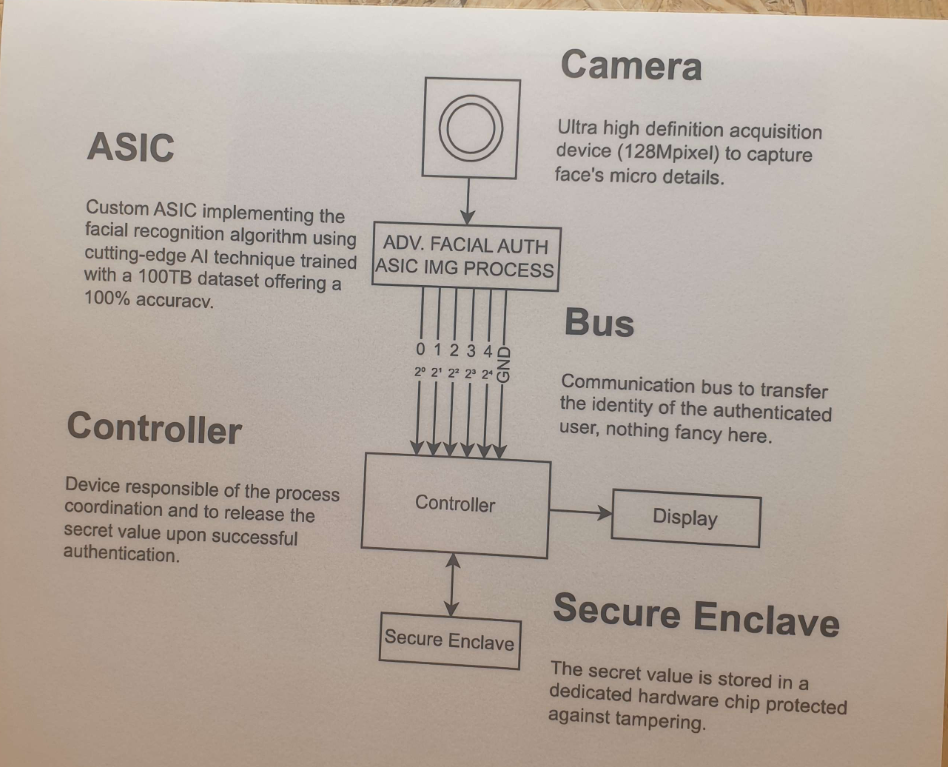
The only important information in the diagram is the powers of 2^wire's index. By default, the ID is 11.
11 = 2^0 + 2^1 + 2^3 In binary : 01011
We can deduce that the default cable power supply is as follows:
0->True1->True2->False3->True4->FalseGND->Force False
As seen on the admin’s picture, to impersonate him and therefore obtain the flag, the required ID is 25.
25 = 2^0 + 2^3 + 2^4 In binary : 11001
To transition from False to True, you need to bridge it with another wire that is in a True state. To transition from True to False, you must bridge it with GND. Therefore, to obtain 25, you have to add two bridges: one between 3 and 4, and one between 1 and GND.To do this, we had paper clips at our disposal on the table
And finally we find the flag :)

Final step : Shamir Secret Sharing
Now that we have the three parts of the flag, we use an algorithm called Shamir Secret Sharing and a tool called ssss on Linux to combine the three flags we can guess it with the firmware code source.
It was a very good challenge, thanks to the Insomni’Hack team for creating it. However, in the first part, it would have been easier and less painful if the exact size of the password had been given with the UV lamp.